Just a quick note: the guys at Homebrewers Outpost rock; if anyone reads this who is near Flag, or shopping by mail from anywhere in the states, check em out.
They've given me the magic ingredients list for the mystery bags in their kits, and have kindly given permission to post them here. (I'll go back and add them to the specific recipe posts.)
Thursday, September 4, 2008
Monday, September 1, 2008
Daulton Ranch Snowmelt Mead
I guess if I'm going to keep my brewing recipes on this blog, I might a well add a link to the mead we did back in Febuary. We cracked open a test bottle a couple of weeks ago, and it was not good at all. Smelling it was like smelling two different liquids at once - one was floral and nice, the other was like smelling grain alcohol or petrol or something - not nice. The flavour was almost bitter, with chemically overtones.
However, the guys at the brew shop said it didn't immediately sound off or anything, and that meads often "run a little hot" when theyre young, which they described as a very harsh alcohol flavour. So with that advice, and taking into account the Fine Lemming Wine we did (which started off tasting harshly of sulphur, but ended up quite drinkable, if a bit bland) we've decided to leave it in the cellar for another 6 months, then crack it out and try it again.
-----
anti ob
And tried it again just now (Aug 22). Definitely better, and Coz agrees. Still a bit of a spirits flavour about it (which is odd, because it really shouldn't be that strong) but now it tastes a bit like an over-strong cocktail instead of a glass of slightly watered down meths. So that's got to be a plus, right?
I could drink it as it is, but I might wait a bit more still and crack it out for Christmas. Mead is more of a cold-weather drink to me anyways...
08/22/2009, 03:23:26 PM
[This user is an administrator] anti ob
I did try it again, sometime around the beginning of the year. Its hard to compare tastes across 6 months, but it seemed a little better? Put it back down for some more rest...
Saturday, August 30, 2008
Homebrewers Outpost Alpine Amber
2.5 gallons water.
1 packet Specialty Grains. (I can tell keeping these recipes is going to be a bit pointless if I don't find out whats in these bags, but I reckon the guys at the shop will tell me.)
Edit: 8oz Crystal 90 and 4oz Special Roast
in a mesh bag, heated to 170F and let to steep (occasionally turning the heat back on to push it back up to 170F) for 10 minutes. Added:
7 lbs. Briess Amber Extract (malt)
stirring, and brought to a rapid boil. Added:
1 oz. Perle hop pellets (Alpha Acid 8.2%)
in a mesh bag. Rapid boil for 55 minutes. Added:
1 oz. Cascade hop pellets (Alpha Acid 6.3%)
in a mesh bag. Rapid boil for 5 minutes. Cooled in an ice bath to ~100F, added cold water to 5 gallons @ 82F. Pitched:
11g Nottingham brewing yeast and put away to ferment at ~68F. Initial S.G. 1.052.
-----
1.018
anti ob | 09.05.08 - 6:36 pm | #
Saturday, August 16, 2008
Brew Two
This is a from a Red Rock Ale kit made by the local brew shop Homebrewers Outpost. Its supposedly a fairly hoppy IPA-like thing, though it looks fairly dark so far.
2.5 gallons water with
1 bag of Specialty Grains (sneaky! They're not telling whats in it...)
Edit: 4oz Chocolate, 4oz Crystal 60, 4oz Special Roast
in a mesh bag, heated to 170F and let to steep (occasionally turning the heat back on to push it back up to 170F) for 20 minutes. Added:
7 lbs. Briess Golden Light Extract
stirring, and brought to a rapid boil.
The brew-pot was making awesome swirly patterns, which it of course refused to repeat once I got the camera out. Still, I could watch these all day.
Added:
1 oz. UK Phoenix hop pellets
in a mesh bag. Rapid boil for 55 minutes. Added:
1 oz. Cascade hop pellets
in a mesh bag. Rapid boil for 5 minutes. Cooled in an ice bath to ~90F, added cold water to 5 gallons @ 80F. Pitched:
11g Nottingham dry brewing yeast. Agitated for 5m and put away to ferment. Initial S.G. 1.050.
Just put it down today, so I'll update this when I find out what it tastes like...
-----
SG steady at 1.014 after 6 days. Kegged with 1 pint of water and 5 oz. dextrose for carbonation. (I'll gas carbonate too, but I'll wait til the other keg runs out.
anti ob | 08.23.08 - 5:34 pm | #
Fridge died on me when I went to gas carbonate, so I cranked it up to 25 PSI to carbonate at approximately 60 F (in the tomb.) According to the charts this should be a bit more than the last one, which was a little flat.
anti ob | 08.30.08 - 6:31 pm | #
Homebrew Porter
Yeah, I know. Whats a brewing recipe doing on a site about longbows? Well I could make up something plausible-sounding about years of the SCA inexticably linking beer and archery in my brain, but the truth is I just didn't feel like starting yet another blog, and I wanted to have somewhere to put brewing recipes where they wouldn't get lost. (Like my late lamented Little Black Brewing Book did. *sigh*)
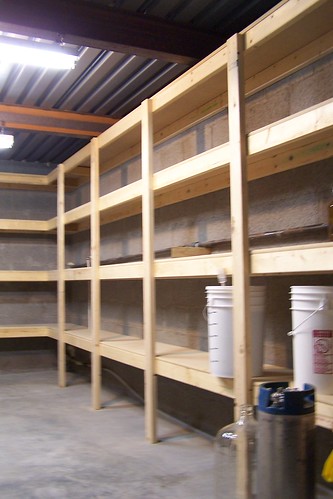
The beer cellar in the new house - room for lots more!
Homebrewing in the US - or at least in Flagstaff AZ - is much less common than it is in Oz, and it seems to work a little differently. Instead of the insert-water-and-wait idiot-proof kits that you can get in any supermarket, they're much more about custom-tailoring the wort as you boil it on the stove. Even the kits seem to come with bags of grain and multiple sets of hops to be added at various pre-set times. (You can get the simpler kits, but even at the brewshop they don't seem to get much mileage.) This is actually kind of handy, because this was the stage of brewing I'd moved on to anyways; I'm not starting from scratch, and I've got a recipe, but I'm still building all the component parts, which lets me tweak things a bit. Also, I've got myself a kegging system here, because I found a used one going cheap, and I hate washing bottles. So without further adieu, allow me to present ny first Mountain View Brew (our new house is on Mtn View Ave):
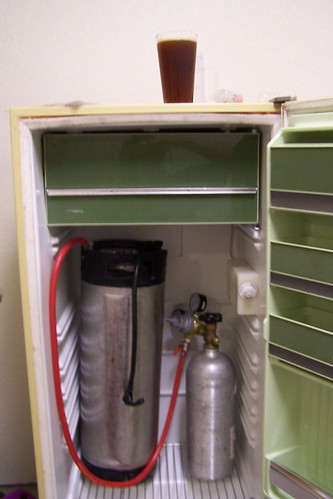
The keg system - no more bottle washing! Hurrah!
Using a Brewer's Best Robust Porter kit and recipe, but I'll spell it out in case I want to do variations on a theme at some later date.
2 gallons water in the pot with
8oz. Crushed Crystal Malt 60L
4oz. Crushed Chocolate Malt
4oz. Crushed Black Patent Malt
in a mesh bag. Heated to 170 F and steeped 20 minutes. Drained without squeezing. Brought to boil. Added:
6.6 lbs. Plain Amber Malt Extract
Returned to boil stirring. Added:
1oz. Cluster Hops
kept at a rapid boil for 55 minutes. Added:
1/2oz. Willamette Hops
kept at a rapid boil for 5 minutes. Rapidly cooled (in an ice bath) to 70 F while stirring to collect trub. Siphoned into 6.5 gallon fermenter. Added room temp water to 5 gallons. Pitched 1 packet of Beer Yeast (forgot to note the type.) Initial temperature 70 F, specific gravity 1.050. Yeast activity largely stopped after 5 days, SG steady at 1.020. Siphoned into a sterile 5g keg after 7 days. Attempted to prime for 1 week with 5oz. Priming Sugar, but got very little carbonation. Gassed with CO2 for an additional week at ~ 36-38F (in the beer fridge) and 12 psi.
-----
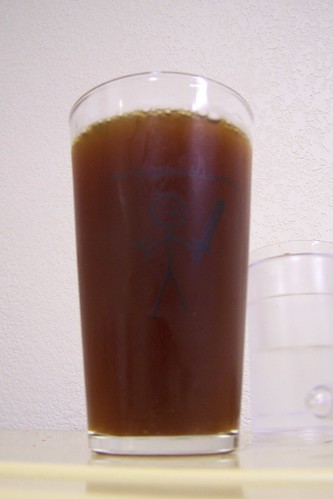
"Robust Porter" - July 2008 (the first glass, so its a little sedimenty)
The resulting beer isn't quite what I'd call a porter, but it is nice. Its hoppier than a porter - but I like hops, so I'm not really complaining - and doesn't have quite as much body as I'd expect. A dark opaque amber colour, with a fair bit of bitterness. Its also very lightly carbonated - sort of English style. You have to pour it from 6in above the glass to get any kind of a head at all (but it is a proper head - not just bubbles - and it does hold onto it reasonably well.) I'm wondering if the low carbonation has anything to do with the altitude, but then I got the carbonation table from the brew shop here in town, so you'd think they'd have mentioned if it doesn't work here. Whatever. Not a big fan of fizzy beers, but I think I will turn it up a notch for the next batch
The beer cellar in the new house - room for lots more!
Homebrewing in the US - or at least in Flagstaff AZ - is much less common than it is in Oz, and it seems to work a little differently. Instead of the insert-water-and-wait idiot-proof kits that you can get in any supermarket, they're much more about custom-tailoring the wort as you boil it on the stove. Even the kits seem to come with bags of grain and multiple sets of hops to be added at various pre-set times. (You can get the simpler kits, but even at the brewshop they don't seem to get much mileage.) This is actually kind of handy, because this was the stage of brewing I'd moved on to anyways; I'm not starting from scratch, and I've got a recipe, but I'm still building all the component parts, which lets me tweak things a bit. Also, I've got myself a kegging system here, because I found a used one going cheap, and I hate washing bottles. So without further adieu, allow me to present ny first Mountain View Brew (our new house is on Mtn View Ave):
The keg system - no more bottle washing! Hurrah!
Using a Brewer's Best Robust Porter kit and recipe, but I'll spell it out in case I want to do variations on a theme at some later date.
2 gallons water in the pot with
8oz. Crushed Crystal Malt 60L
4oz. Crushed Chocolate Malt
4oz. Crushed Black Patent Malt
in a mesh bag. Heated to 170 F and steeped 20 minutes. Drained without squeezing. Brought to boil. Added:
6.6 lbs. Plain Amber Malt Extract
Returned to boil stirring. Added:
1oz. Cluster Hops
kept at a rapid boil for 55 minutes. Added:
1/2oz. Willamette Hops
kept at a rapid boil for 5 minutes. Rapidly cooled (in an ice bath) to 70 F while stirring to collect trub. Siphoned into 6.5 gallon fermenter. Added room temp water to 5 gallons. Pitched 1 packet of Beer Yeast (forgot to note the type.) Initial temperature 70 F, specific gravity 1.050. Yeast activity largely stopped after 5 days, SG steady at 1.020. Siphoned into a sterile 5g keg after 7 days. Attempted to prime for 1 week with 5oz. Priming Sugar, but got very little carbonation. Gassed with CO2 for an additional week at ~ 36-38F (in the beer fridge) and 12 psi.
-----
"Robust Porter" - July 2008 (the first glass, so its a little sedimenty)
The resulting beer isn't quite what I'd call a porter, but it is nice. Its hoppier than a porter - but I like hops, so I'm not really complaining - and doesn't have quite as much body as I'd expect. A dark opaque amber colour, with a fair bit of bitterness. Its also very lightly carbonated - sort of English style. You have to pour it from 6in above the glass to get any kind of a head at all (but it is a proper head - not just bubbles - and it does hold onto it reasonably well.) I'm wondering if the low carbonation has anything to do with the altitude, but then I got the carbonation table from the brew shop here in town, so you'd think they'd have mentioned if it doesn't work here. Whatever. Not a big fan of fizzy beers, but I think I will turn it up a notch for the next batch
Sunday, April 20, 2008
Tillering
Well everything I've ever read about tillering a bow says that its a bit of an art form. That you do a lot of it by look and by feel. However, one of those things I read said that while it _is_ a bit of an art, there's also some maths behind it - an article in something called PrimitiveWays by Dick Baugh. Hurrah! Because I don't know the art, but I can do maths...
Because the Bow Construction FAQ suggested that I add a bit of extra length to the bow when using a somewhat inferior wood like the oak we've got, and because its always easier to take more off than put any back, I've got a bow thats about 78" long. So I had to do a little extrapolation on the tables in the tillering article to get out to 78" - his longest is 72". For 72" and a 40 lb. draw he uses .36, so I extrapolate from the table to .35 for 78" and a 40 lb. draw. To get to a draw of 45 lbs. - my target - you multiply by 40/45, and using a standard weight of a gallon jug full of water (@8.34 lbs.) I get:
0.35 x 40/45 x 8.34 = 2.59 inches.
Great! Except rulers with hundreths of inches on them are hard to come by in my world, so I'll convert to cm: 6.58 cm. And the deflection for the outer half of each limb is supposed to be between 1/4 and 1/3 of the deflection for the full limb, so between 1.65 and 2.19 cm. I've carried out to an extra decimal place while doing the maths, but I'll be lucky to be able to measure accurately to the nearest millimeter, so we'll call it:
Full Limb: 66mm.
Half Limb: 17 - 22mm.
So I bought some sawhorses, and came up with the following rig for taking the measurements:

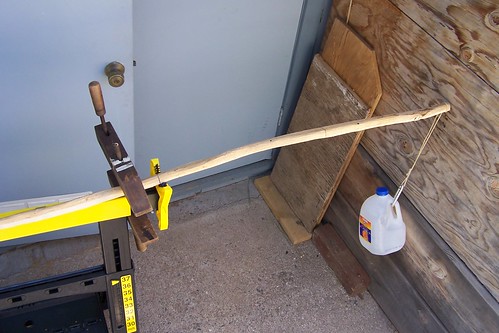
The bow is held fast on the horse by 2 clamps, with the center of the bow or the midpoint line of the limb exactly on the edge of the horse. Its pushed up to the fence until the end just touches, and I make a mark. Then I add a gallon jug of water to the string and measure the deflection:
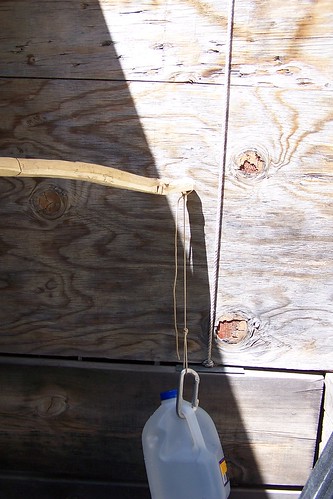
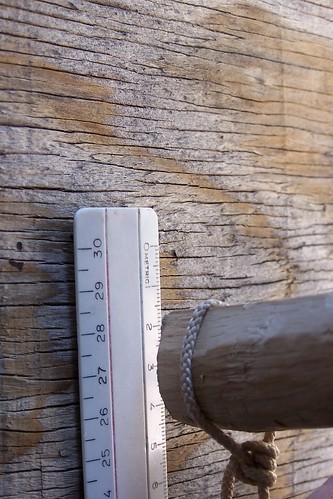
We did the outer half of the limb first, and when it was within the target range then we shifted to the halfway mark and measured for the whole limb - taking wood relatively evenly off the belly and sides of the bow, wanting to keep the back as a single ring of wood (as much as we'd managed so far...) We got one limb done, and then it was getting late and my hands were getting sore, so we'll leave the other side for another day.
Because the Bow Construction FAQ suggested that I add a bit of extra length to the bow when using a somewhat inferior wood like the oak we've got, and because its always easier to take more off than put any back, I've got a bow thats about 78" long. So I had to do a little extrapolation on the tables in the tillering article to get out to 78" - his longest is 72". For 72" and a 40 lb. draw he uses .36, so I extrapolate from the table to .35 for 78" and a 40 lb. draw. To get to a draw of 45 lbs. - my target - you multiply by 40/45, and using a standard weight of a gallon jug full of water (@8.34 lbs.) I get:
0.35 x 40/45 x 8.34 = 2.59 inches.
Great! Except rulers with hundreths of inches on them are hard to come by in my world, so I'll convert to cm: 6.58 cm. And the deflection for the outer half of each limb is supposed to be between 1/4 and 1/3 of the deflection for the full limb, so between 1.65 and 2.19 cm. I've carried out to an extra decimal place while doing the maths, but I'll be lucky to be able to measure accurately to the nearest millimeter, so we'll call it:
Full Limb: 66mm.
Half Limb: 17 - 22mm.
So I bought some sawhorses, and came up with the following rig for taking the measurements:
The bow is held fast on the horse by 2 clamps, with the center of the bow or the midpoint line of the limb exactly on the edge of the horse. Its pushed up to the fence until the end just touches, and I make a mark. Then I add a gallon jug of water to the string and measure the deflection:
We did the outer half of the limb first, and when it was within the target range then we shifted to the halfway mark and measured for the whole limb - taking wood relatively evenly off the belly and sides of the bow, wanting to keep the back as a single ring of wood (as much as we'd managed so far...) We got one limb done, and then it was getting late and my hands were getting sore, so we'll leave the other side for another day.
Catch Up
So, no updates since the end of last August...
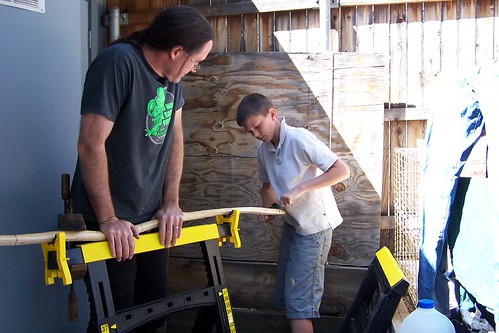
Well part of that is because, like my usual slack self, I've been working on this sort of one weekend a month. And not even that while galavanting around the world the last couple of months, nor the months previous where the backyard was too full of snow to do anything much - fortunately our new place will have a big enough indoor space to use as a workroom in winter. But a big part of that was just that there wasn't much to say; before the snows Jamie and I had a go at it on a semi-regular basis, but we were just doing more rough shaping, so there wasn't much to say. Catch-up time.
So, how to know when the rough shaping was getting close enough to think about tillering? Well one way is to bend the thing a bit, but I'm wary of doing that too soon because I don't want to break anything. And I was also concerned a bit about getting the shape right, as much as I could. So I took measurements from the Bow Construction FAQ and ended up with about 1.25" x 1.25" at the grip (in a distorted oval shape drawn around a cross 5/8" on either side arm, extending 1" below the cross and 1/4" above it), tapering down to about 5/8" wide x 1/2" deep. From these rough estimates, I made up some templates:
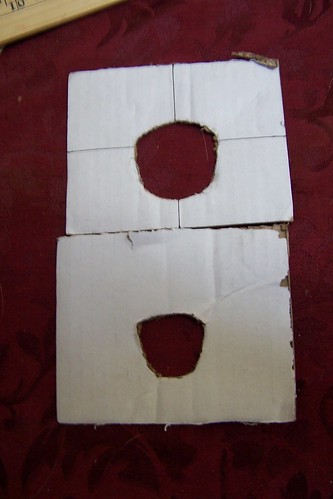
The templates are a couple mil bigger than the actual intended final measurements in every direction, so I could slide them over the too-big stick and see where it touched - those were the bits that needed trimming. So we did that back-and-forth for a few sessions until we pretty much fit the templates evenly. And at that point we could bend the stick a bit, so I figured it was time to think about tillering in earnest.
Well part of that is because, like my usual slack self, I've been working on this sort of one weekend a month. And not even that while galavanting around the world the last couple of months, nor the months previous where the backyard was too full of snow to do anything much - fortunately our new place will have a big enough indoor space to use as a workroom in winter. But a big part of that was just that there wasn't much to say; before the snows Jamie and I had a go at it on a semi-regular basis, but we were just doing more rough shaping, so there wasn't much to say. Catch-up time.
So, how to know when the rough shaping was getting close enough to think about tillering? Well one way is to bend the thing a bit, but I'm wary of doing that too soon because I don't want to break anything. And I was also concerned a bit about getting the shape right, as much as I could. So I took measurements from the Bow Construction FAQ and ended up with about 1.25" x 1.25" at the grip (in a distorted oval shape drawn around a cross 5/8" on either side arm, extending 1" below the cross and 1/4" above it), tapering down to about 5/8" wide x 1/2" deep. From these rough estimates, I made up some templates:
The templates are a couple mil bigger than the actual intended final measurements in every direction, so I could slide them over the too-big stick and see where it touched - those were the bits that needed trimming. So we did that back-and-forth for a few sessions until we pretty much fit the templates evenly. And at that point we could bend the stick a bit, so I figured it was time to think about tillering in earnest.
Subscribe to:
Posts (Atom)

