Saturday, August 25, 2007
New Links
Added a couple of new links. Under Related is a link to a very simple hand-made fletching jig of sorts. Really just common sense, but worth reminding myself about. Under Bowmaking is a link to an attempt to take some of the art out of tillering by doing the maths and giving you some measurements to look for. I suspect its no substitute for a real masters depth of experience... but I haven't got that, so I'll take whatever help I can get. *grin*
Rough Shaping
Ok, so I cheated; I did a bit of work on this a few weeks back, but never got around to writing it up. So this is really two half-afternoons' work.
The first thing I worked out when I looked at my staves and thought about it a bit, is that that nice smooth outer layer from under the bark isn't going to be the back of my bow after all. The problem is that the lighter outer layer of wood is too thick; if I make my bow from the bit right under the bark, I wont be getting any of the heartwood, from which the bow is meant to draw much of its strength. Ah well, it had seemed a bit easy that way. So the first afternoon I had a go at this I did some rough shaping of the skinniest stave with an axe and wedges - basically removing the outer cm or so of rings from the core. But the references I've found say its fairly important to try to have the back of the bow be an unbroken growth ring, and theres only so fiddly you can be with an axe. I didn't have any better tools, so I stopped.
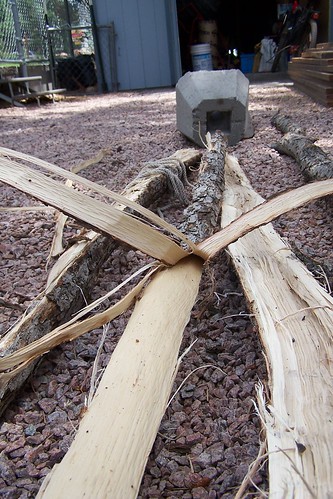
After a couple of weeks waiting for The Tool Guy's stock to come in, I've laid hands on a draw knife and a plane. They even ordered me a spoke shave, after they looked it up to find out what one is - its a bit of an unusual piece of gear these days I think. So Jamie came round this afternoon and we had a go at the next stage of shaping until the thunder and rain arrived and shut us down:

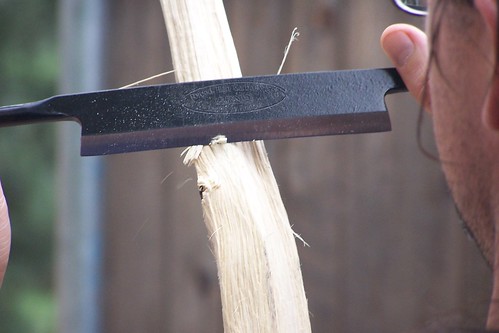
We tried working it both ways: standing on end and lying down. Some bits were easier one way or the other, but it varied. Unfortunately I didn't get a chance to finish the rough shaping before it started raining, but we did get the sides fairly well smoothed out, which showed up a couple of the flaws I was looking at earlier:
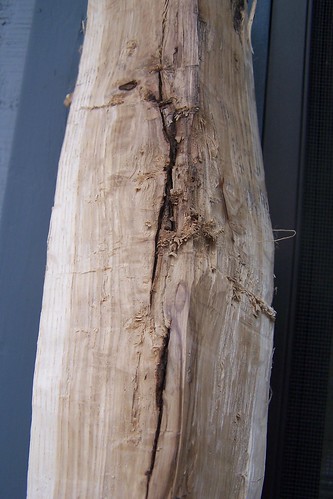
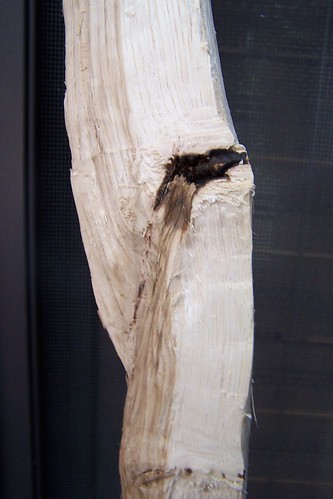
The one on the left I _think_ doesn't go very far out towards the back of the bow, and its right out near one tip where I need to take off a fair bit of wood for the taper, so I'm hoping I'm going to end up cutting it out completely. The one on the right is about 6-8 inches from the other tip and looks to go right through - I'm just going to have to hope it doesn't weaken it too much. I'll taper less around that bit, at least to start.
The first thing I worked out when I looked at my staves and thought about it a bit, is that that nice smooth outer layer from under the bark isn't going to be the back of my bow after all. The problem is that the lighter outer layer of wood is too thick; if I make my bow from the bit right under the bark, I wont be getting any of the heartwood, from which the bow is meant to draw much of its strength. Ah well, it had seemed a bit easy that way. So the first afternoon I had a go at this I did some rough shaping of the skinniest stave with an axe and wedges - basically removing the outer cm or so of rings from the core. But the references I've found say its fairly important to try to have the back of the bow be an unbroken growth ring, and theres only so fiddly you can be with an axe. I didn't have any better tools, so I stopped.
After a couple of weeks waiting for The Tool Guy's stock to come in, I've laid hands on a draw knife and a plane. They even ordered me a spoke shave, after they looked it up to find out what one is - its a bit of an unusual piece of gear these days I think. So Jamie came round this afternoon and we had a go at the next stage of shaping until the thunder and rain arrived and shut us down:
We tried working it both ways: standing on end and lying down. Some bits were easier one way or the other, but it varied. Unfortunately I didn't get a chance to finish the rough shaping before it started raining, but we did get the sides fairly well smoothed out, which showed up a couple of the flaws I was looking at earlier:
The one on the left I _think_ doesn't go very far out towards the back of the bow, and its right out near one tip where I need to take off a fair bit of wood for the taper, so I'm hoping I'm going to end up cutting it out completely. The one on the right is about 6-8 inches from the other tip and looks to go right through - I'm just going to have to hope it doesn't weaken it too much. I'll taper less around that bit, at least to start.
Sunday, July 15, 2007
Splitting and Peeling
Having had a couple of months to season, I got my lengths of wood out to try to turn them into bowstaves proper.


On the left (if the formatting works, and your screen is wide enough) an end-view of the larger of the two logs. You can see where it has started to crack slightly in the seasoning. Trust me that this didn't make it at all easy to split. I can see why this oak might be appropriate for bows; its _tough_ and it really didn't want to fall apart.
On the right, I have finally got the bastard started, after which it went better, but its still holding on something fierce.
Eventually I got the thing split in 3:
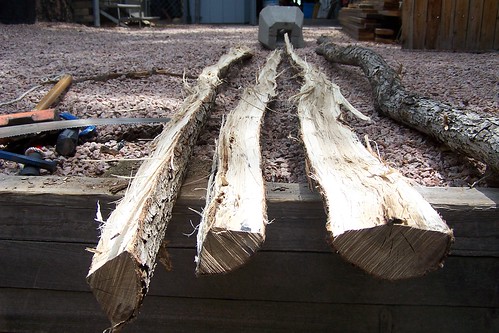
The wider bit on the right _may_ be big enough to split again, but I'm going to see how much I lose in the shaping - we're looking at the wide ends here, and it narrows a bit up the other end. The peeling by contrast was easy; as you can see, once you picked the end of the bark up with a chisel it came off in big clean strips, leaving a smooth outer growth ring exposed. From the sound of it, I should be using this as the back of the bow as intact as possible.

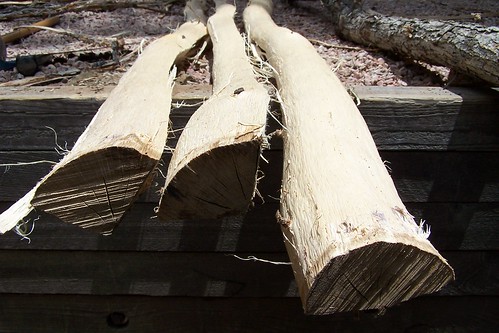
The peeled staves - especially the bottom one - revealed some small knots that may be troublesome. Also, while the angle of the last shot exaggerates it a bit, they're not what you'd call perfectly straight and there was some twist in the split.
On the left (if the formatting works, and your screen is wide enough) an end-view of the larger of the two logs. You can see where it has started to crack slightly in the seasoning. Trust me that this didn't make it at all easy to split. I can see why this oak might be appropriate for bows; its _tough_ and it really didn't want to fall apart.
On the right, I have finally got the bastard started, after which it went better, but its still holding on something fierce.
Eventually I got the thing split in 3:
The wider bit on the right _may_ be big enough to split again, but I'm going to see how much I lose in the shaping - we're looking at the wide ends here, and it narrows a bit up the other end. The peeling by contrast was easy; as you can see, once you picked the end of the bark up with a chisel it came off in big clean strips, leaving a smooth outer growth ring exposed. From the sound of it, I should be using this as the back of the bow as intact as possible.
The peeled staves - especially the bottom one - revealed some small knots that may be troublesome. Also, while the angle of the last shot exaggerates it a bit, they're not what you'd call perfectly straight and there was some twist in the split.
Finding a Bowstaff
Having read a bit more - notably the Bow Construction FAQ I discovered that, of the woods commonly available near Flagstaff, oak, juniper, and cedar might be suitable. Checked with the Forest Service about getting a permit to cut a tree, and they said that cedar here is limited. In the end I went with oak because:
* the oaks here grow very straight.
* its the most common, and I might as well make my first mistakes on common wood.
* there's a stand of them growing in our front yard, which needs thinning anyways. (Hurrah for minimising effort.)

Jamie is leaning against our chosen vitim.
Following the advice from the FAQ, we picked a tree from 4-6 inches in diameter (well, 12-16 inches in circumference, which is easier to measure before you cut it down) and with a fairly constant width. With a little help from Jamie, I cut down the tree and stripped off the branches, and, since I couldn't find any references to whether you seasoned it before or after splitting, put it up in the rafters of the shed. This would have been about the beginning of April. (Since then I have found at least one reference to someone splitting first and then seasoning, but even there it was unclear as to how much of the shaping happened before the staves were put away to season. Hopefully having done it the other way round isn't going to cripple the attempt from the start. We'll see.)
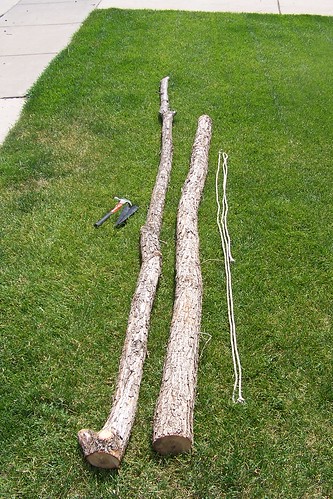
The rope alongside is roughly the length of the finished bow. I cut the staves long so I could work around flaws or knots to a certain extent.
* the oaks here grow very straight.
* its the most common, and I might as well make my first mistakes on common wood.
* there's a stand of them growing in our front yard, which needs thinning anyways. (Hurrah for minimising effort.)
Jamie is leaning against our chosen vitim.
Following the advice from the FAQ, we picked a tree from 4-6 inches in diameter (well, 12-16 inches in circumference, which is easier to measure before you cut it down) and with a fairly constant width. With a little help from Jamie, I cut down the tree and stripped off the branches, and, since I couldn't find any references to whether you seasoned it before or after splitting, put it up in the rafters of the shed. This would have been about the beginning of April. (Since then I have found at least one reference to someone splitting first and then seasoning, but even there it was unclear as to how much of the shaping happened before the staves were put away to season. Hopefully having done it the other way round isn't going to cripple the attempt from the start. We'll see.)
The rope alongside is roughly the length of the finished bow. I cut the staves long so I could work around flaws or knots to a certain extent.
The Mark I
Brief mention of my very first attempt at bowmaking, back in Febuary. I had read that cedar was a usable wood, and my nephew James was very excited about making a bow when we were up at Volcano, which has a lot of cedar around. Didn't have time to do any more research before we went, so we just had a go.
Not really knowing how big a tree to go for, we picked a cedar sapling that was already downed but resting well above the ground, figuring it might have had a chance to season a bit. It looked solid and bug-free; one of the advantages of cedar. This particular sapling was about the right diameter for a bow already, so I just cut it in half lengthwise to get a D-shape, shaping it with an axe. What I didn't do was make any effort to make the center of the bow thicker, and that combined with a helpful relative demonstrating how it could bend just as well the wrong direction - to the sound of an audible crack - meant that it snapped in half the first time we tried to string it. This was unfortunate, but it brought home to me exactly how much of the stress is naturally right where your hand rests, and the need for a reinforced handgrip.
Not really knowing how big a tree to go for, we picked a cedar sapling that was already downed but resting well above the ground, figuring it might have had a chance to season a bit. It looked solid and bug-free; one of the advantages of cedar. This particular sapling was about the right diameter for a bow already, so I just cut it in half lengthwise to get a D-shape, shaping it with an axe. What I didn't do was make any effort to make the center of the bow thicker, and that combined with a helpful relative demonstrating how it could bend just as well the wrong direction - to the sound of an audible crack - meant that it snapped in half the first time we tried to string it. This was unfortunate, but it brought home to me exactly how much of the stress is naturally right where your hand rests, and the need for a reinforced handgrip.
The Longbow Project
This is a record of my project to make a longbow from scratch. Lets be clear here - I have no idea what I'm doing, so look elsewhere for your expert advice. But I wanted a place to keep all of the web resources I've been finding in one place, and if I document the progress then maybe someone can eventually tell me where I went wrong... Plus its just kinda fun. Those who have witnessed my projects in the past will know that this may take some time (remember the barrel thing? I'll go back and finish that one day, I swear...)
Subscribe to:
Posts (Atom)

