Sunday, April 20, 2008

Tillering

Well everything I've ever read about tillering a bow says that its a bit of an art form. That you do a lot of it by look and by feel. However, one of those things I read said that while it _is_ a bit of an art, there's also some maths behind it - an article in something called PrimitiveWays by Dick Baugh. Hurrah! Because I don't know the art, but I can do maths...

Because the Bow Construction FAQ suggested that I add a bit of extra length to the bow when using a somewhat inferior wood like the oak we've got, and because its always easier to take more off than put any back, I've got a bow thats about 78" long. So I had to do a little extrapolation on the tables in the tillering article to get out to 78" - his longest is 72". For 72" and a 40 lb. draw he uses .36, so I extrapolate from the table to .35 for 78" and a 40 lb. draw. To get to a draw of 45 lbs. - my target - you multiply by 40/45, and using a standard weight of a gallon jug full of water (@8.34 lbs.) I get:

0.35 x 40/45 x 8.34 = 2.59 inches.

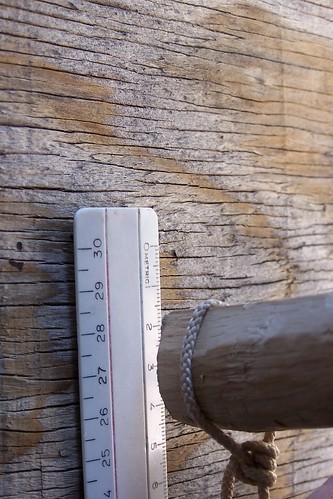
Great! Except rulers with hundreths of inches on them are hard to come by in my world, so I'll convert to cm: 6.58 cm. And the deflection for the outer half of each limb is supposed to be between 1/4 and 1/3 of the deflection for the full limb, so between 1.65 and 2.19 cm. I've carried out to an extra decimal place while doing the maths, but I'll be lucky to be able to measure accurately to the nearest millimeter, so we'll call it:

Full Limb: 66mm.
Half Limb: 17 - 22mm.

So I bought some sawhorses, and came up with the following rig for taking the measurements:


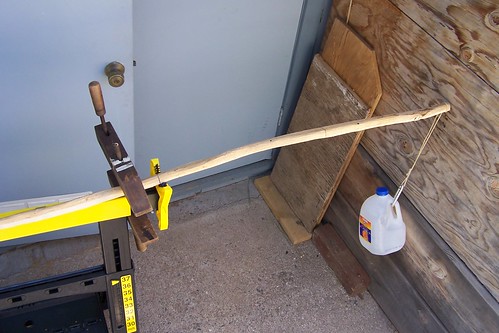
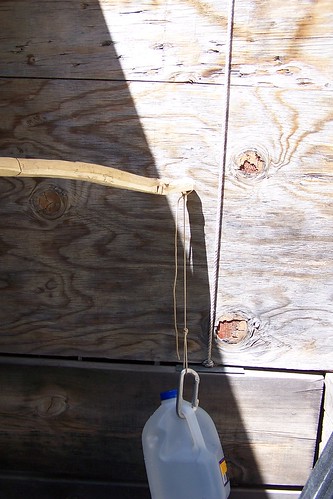
The bow is held fast on the horse by 2 clamps, with the center of the bow or the midpoint line of the limb exactly on the edge of the horse. Its pushed up to the fence until the end just touches, and I make a mark. Then I add a gallon jug of water to the string and measure the deflection:


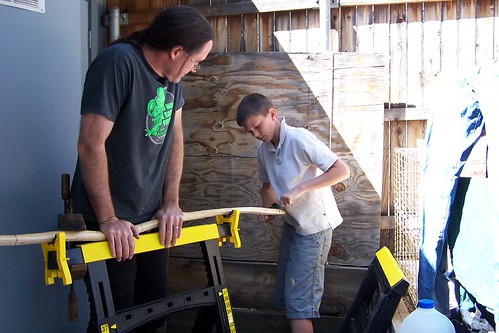
We did the outer half of the limb first, and when it was within the target range then we shifted to the halfway mark and measured for the whole limb - taking wood relatively evenly off the belly and sides of the bow, wanting to keep the back as a single ring of wood (as much as we'd managed so far...) We got one limb done, and then it was getting late and my hands were getting sore, so we'll leave the other side for another day.

Catch Up

So, no updates since the end of last August...

Well part of that is because, like my usual slack self, I've been working on this sort of one weekend a month. And not even that while galavanting around the world the last couple of months, nor the months previous where the backyard was too full of snow to do anything much - fortunately our new place will have a big enough indoor space to use as a workroom in winter. But a big part of that was just that there wasn't much to say; before the snows Jamie and I had a go at it on a semi-regular basis, but we were just doing more rough shaping, so there wasn't much to say. Catch-up time.

So, how to know when the rough shaping was getting close enough to think about tillering? Well one way is to bend the thing a bit, but I'm wary of doing that too soon because I don't want to break anything. And I was also concerned a bit about getting the shape right, as much as I could. So I took measurements from the Bow Construction FAQ and ended up with about 1.25" x 1.25" at the grip (in a distorted oval shape drawn around a cross 5/8" on either side arm, extending 1" below the cross and 1/4" above it), tapering down to about 5/8" wide x 1/2" deep. From these rough estimates, I made up some templates:


The templates are a couple mil bigger than the actual intended final measurements in every direction, so I could slide them over the too-big stick and see where it touched - those were the bits that needed trimming. So we did that back-and-forth for a few sessions until we pretty much fit the templates evenly. And at that point we could bend the stick a bit, so I figured it was time to think about tillering in earnest.